The Handmade Philocalist
🌹 Easy Crochet Rose Tutorial for Beginners – My First Blog Post!
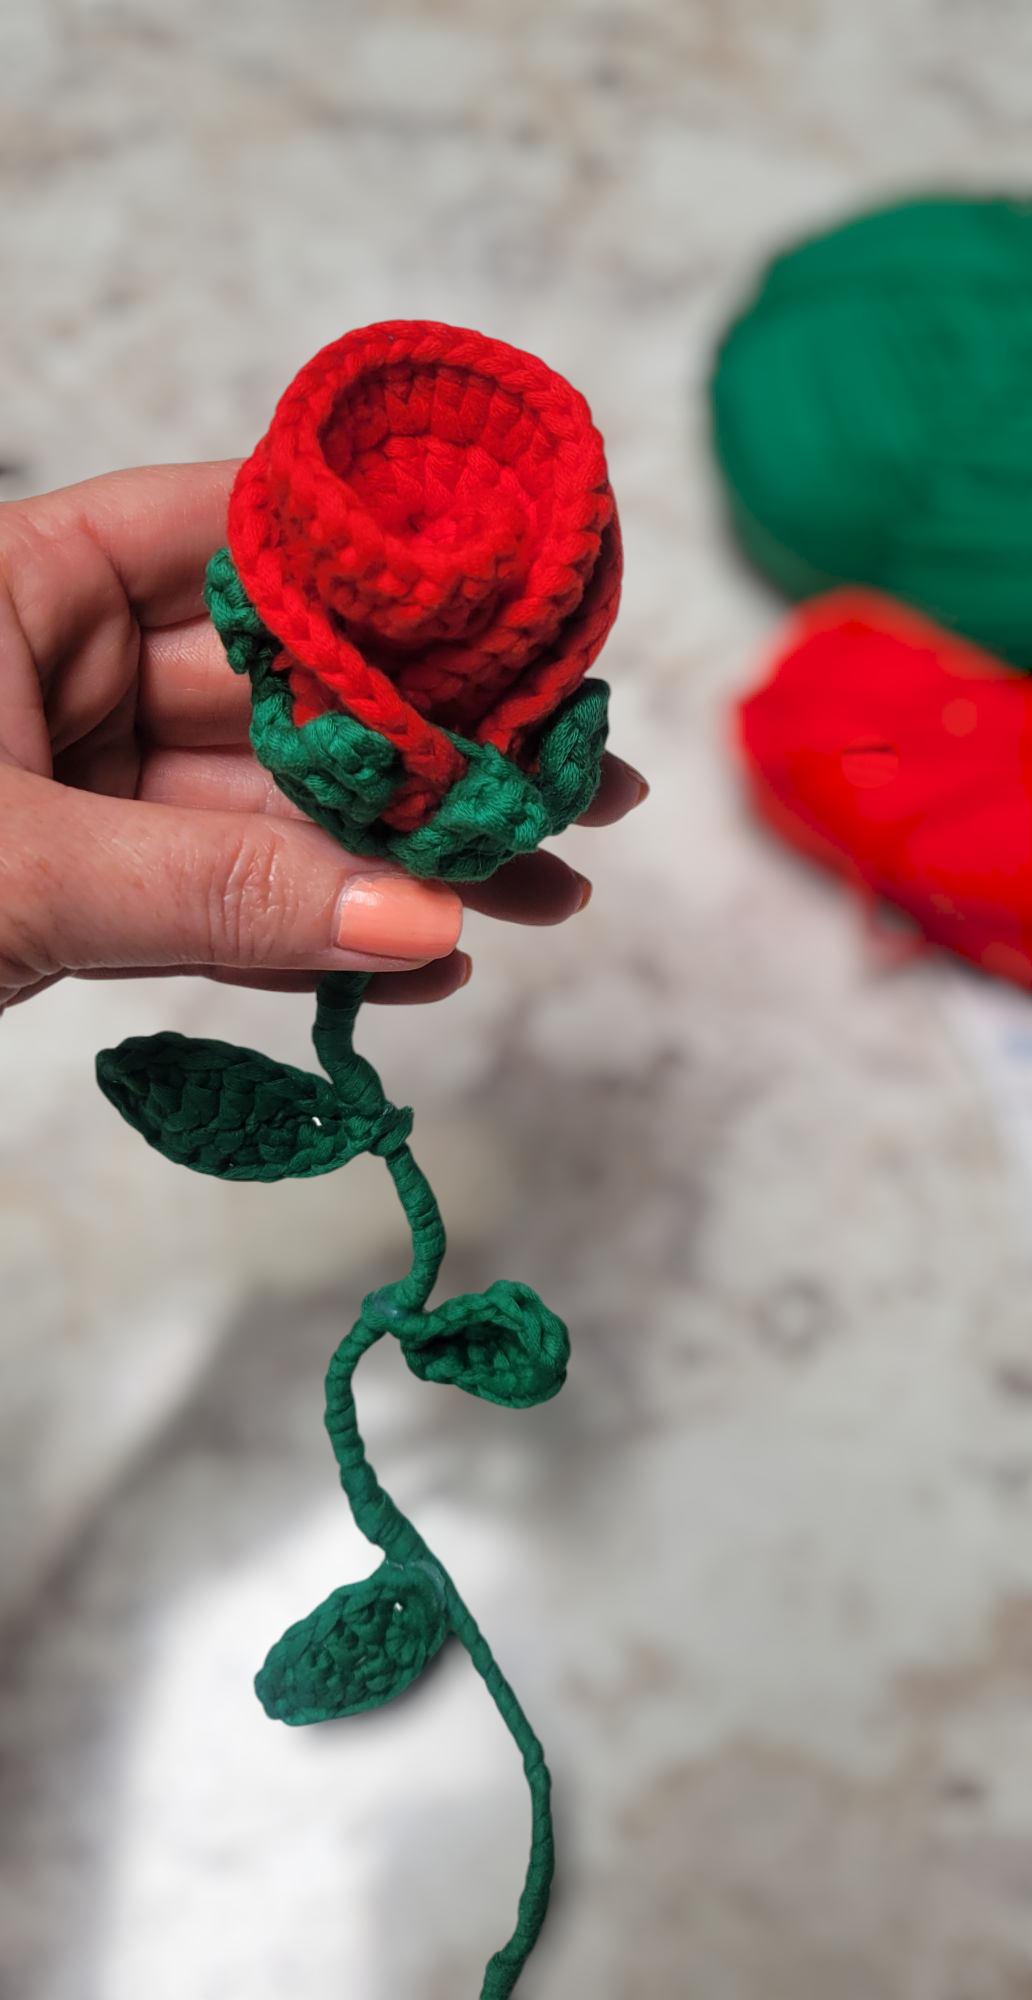
You'll Love This Crochet Rose -- the perfect gift or home decor
Hi there and welcome to my very first blog post! I’m so excited to share this special moment with you—and what better way to begin than with something beautiful, simple, and totally beginner-friendly: a DIY crochet rose!
Whether you're picking up a hook for the first time or just looking for a quick project, this crochet rose is the perfect place to start. It's a hack I wish I knew earlier on my crochet journey—super easy to make, yet it looks impressively detailed. These little roses can be turned into brooches, hair accessories, gift toppers, or even added to your favorite bag or hat for a pop of handmade charm. Or make a full bouquet for your kitchen table or bedroom nightstand.
🧶 Why You'll Love This Crochet Rose:
- Beginner-friendly: Only basic stitches required!
- Quick project: Make one in under 30 minutes.
- Versatile: Perfect for last-minute gift ideas or home décor.
- Customizable: Use any yarn color or weight you like. I used red for the rose and green for the stem and leaves.
🌸 What You'll Need:
- A small amount of yarn (I used DK weight, but any type will do!)
- A matching crochet hook (I used 3.5mm)
- Yarn needle for sewing
- Scissors
- Floral wire
✨ The Simple Crochet Rose Hack:
The magic here is in crocheting in the round, then roll it up, tie a pierce of yarn in the middle, and flip the bottom half up it into a rose shape—no complicated shaping needed! It’s like a little crochet trick that gives you beautiful results every time. I'll walk you through each step in the tutorial below.
Row 1: 12 US DC, slip stitch
Row 2: 2 Ch, (DC inc) x12, Sl St (24)
Row 3: 2 Ch, (DC, inc) x12, Sl St (36)
Row 4: 2 Ch, (2 DC, inc) x12, Sl St (48)
Row 5: (2 Ch, sl st) all around
Sepals/ Leaves
Row 1: 10 HDC, Sl St, Ch
Row 2: (HDC, inc) x5, Sl St (15)
Row 3: [(6 Ch, Skip 1 Ch, SC, 2 HDC, 2 DC), Skip 1 St, 2 Sl St)] x 5, leave a long tail
Sew the Sepals to the Rose with yarn needle
Stem
wrap green yarn around your floral wire. Make sure you have floral wire that is strong enough, or twist multiple layers together to make it strong enough to support the rose and sepal. Use a glue gun to attach the stem to the sepals. I also glued some leaves to the stem
Check out my { https://www.youtube.com/@philocalistco
for a step by step tutorial video. Like and Subscribe while you are there, for more tutorials that will be featured on this blog.
🛍️ Visit My Etsy Shop!
If you love this project and want more, check out my { https://www.etsy.com/shop/Philocalistcompany where I offer digital crochet patterns for beginners and beyond! From cozy accessories to whimsical décor, I’m constantly adding new designs you can download and start right away.
Supporting my shop helps me continue creating and sharing these tutorials with you—and it means the world to me!
💝 A Thoughtful Gift Idea
Crochet roses make meaningful gifts that don’t require much time or yarn. Stitch up a bouquet for Mother's Day, Valentine’s Day, or just because. Add a little note and wrap them in brown paper for that sweet handmade touch.
Thanks so much for joining me on this crochet journey. I can't wait to share more DIY projects, patterns, and inspiration with you. Be sure to follow along and leave a comment if you try this tutorial—I’d love to see your creations!
Until next time,
💗 Sarah | Philocalist
Follow me and Share my Content so we can grow our little community
The Handmade Philocalist